VPN with Raspberry PI: Avoiding control of Big Brother!
This article includes a tutorial that requires network and Linux technical knowledge. However, if you want to know what is a VPN and how it works, the first part is non-super-geek friendly.
So, I moved to a new flat inside a college student residence that looks like Google Headquarters. Everything was fine so far, until I tried to download torrent files to watch series that were not released in Spain yet.

It appears that there is some kind of Firewall blocking the access to websites that the Big Brother from the residence consider ‘not good for you’. First I tried if it was just DNS-level blocking, but entering the page IP instead of the webpage name was still firing the firewall. Most likely, they use a software that directly blocks requests to certain IP addresses, and such address list is updated very frequently.
Anyway, I understand that they limit download speed so the network does not collapse due to a thousand students trying to download the last episode of Big Bang theory at the same time. However, blocking websites is against my principles and I MUST solve that.
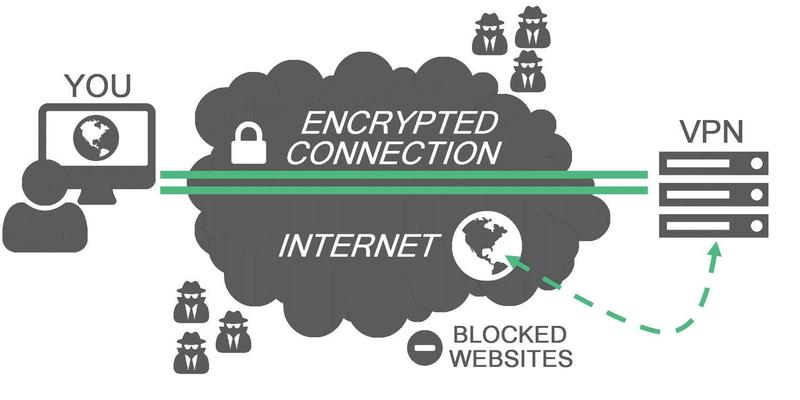
So I decided to use a VPN (Virtual Private Network). A Virtual Private Network is a method that allows a computer to a remote local network, and use Internet as it was used from there. It extends a private network using the Internet, and enables users to send and receive data across shared or public networks as if their computing devices were directly connected to the private network.
In my case, I wanted a VPN located at my home at Huesca, so I can use my computer from Barcelona as if I were connected directly from Huesca. That means that I would have the IP address from my home, and that I will have all the restrictions from there: none.
Of course magic does not exist, and Internet cannot travel through the air (in long distances); I still use the connection at Barcelona, but a tunnel is created so all the traffic is encrypted and goes to my VPN at Huesca.
Let’s illustrate it with a simple use case. Imagine that I am at Barcelona and I want to download a torrent.
- I connect to my VPN at Huesca. My laptop establishes an encrypted connection to my Raspberry PI at Huesca through the residence Internet connection.
- From Barcelona, I request to download the torrent file.
- The request goes from the encrypted channel to the Raspberry PI, and the Raspberry PI forwards it to the server that contains the torrent file, as if it was performed from Huesca.
- My laptop starts downloading the torrent, but actually, the Raspberry PI is the one that is downloading the torrent from my Huesca’s Internet connection, and forwarding all the traffic through an encrypted channel to my laptop.
So the laptop tells the Raspberry PI which network requests want to perform through an encrypted channel (so the firewall cannot detect it), the Raspberry PI performs them and them passes the results to my laptop.
Let’s stop talking and see how I created my VPN. For this set-up, I will use my dear Raspberry Pi 2 as a VPN Server.
Initial Set-up
All this set-up must be performed in the place you want to set-up your VPN. If I want to appear as connected from Huesca, then the Raspberry PI and all the configuration must be in Huesca.
Then, you will be able to connect from anywhere in the world as if you were connected from Huesca (great city, by the way).
Installing Raspbian OS
We will start installing Raspbian on the Raspberry PI if we already didn’t. This tutorial explains how to install it without a TV: we just burn the image into the SD card, turn on the Raspberry PI with an ethernet cable, and SSH into it to open a console.
Network configuration
Now, something that I always do when setting-up a Raspberry PI is to assign it a fixed IP within the local network, so, if it restarts, the DHCP system of the router does not assing it an unknown direction.
Again, there are many tutorials that explain it better that I ever could. I followedthis one using the DHCPCD method.
In my case, I set the IP fixed to 192.168.1.3.
Setting up Dynamic DNS
IPv4 addresses are scarce, so many IP providers re-allocate them to customers frequently. If you restart your router, most probably your public IP will change. However, we need a fixed IP or a fixed name to access the VPN from outside! What we will do is set-up a Dynamic DNS domain: it is a domain (such as ismaelrh.com) that changes the IP address it is pointing to when your public IP changes.
Creation of domain
I always use noip.com as it is free and fast. Go to the webpage and create a dynamic-dns domain.
Installation of no-ip client on Raspberry PI
In order to keep the dynamic DNS domain updated with our public IP even when it changes, the Raspberry PI periodically comunicates with the no-ip servers to tell the public IP being used. To do that, we need to install a little program that will do that. Just follow [this simple instructions] (https://www.noip.com/support/knowledgebase/install-ip-duc-onto-raspberry-pi/).
Setting up OpenVPN
Software installation
Get the script, make it executable and run it.
curl -O https://raw.githubusercontent.com/Angristan/openvpn-install/master/openvpn-install.sh
chmod +x openvpn-install.sh
./openvpn-install.sh
Follow the instructions. Default values are enough. When it asks you about your public IP, just type the Dynamic Domain you got from no-ip.
Opening ports in your router
You need to open the 1194 UDP port in your router (if you used OpenVPN default configuration) and point it to the fixed IP address of your Raspberry PI, so we can access the VPN from outside. This will make that our router, when receives a request to port 1194 from the exterior, will direct the traffic to our little Raspi.
In my case, I used the router configuration interface accesible via a webbrowser on http://192.168.1.1, but the method varies between router vendors and ISPs (I am using Movistar).
Testing your VPN
When you installed OpenVPN, a file was stored in your home directory with the name of the client you specified. In my case, it is “isma.ovpn”. Just extract it from the Raspberry PI (using FTP or SCP from another computer in the same network).
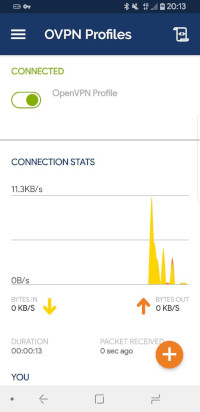
To test the VPN, I just installed OpenVPN connect for Android, and loaded such “isma.ovpn” file. Then, I disconnected from WiFi and connected to network data to try it. I was able to connect to my VPN, so now, even if I am in Australia being chased by some kanguros, my mobile will be connected to the VPN and the rest of the world will think I am connected from Huesca.
Conclusions
Now I am able to download all the torrents I want and access every webpage from my residence. All the traffic between my computer and my VPN at Huesca is totally encrypted, so the firewall cannot detect what is inside and, therefore, cannot block it.
However, not everything is nice. We have to take into account that, when connected to the VPN, all the traffic passes through the VPN internet connection and the connection we are using.
In my case, when I download a movie, the movie goes from the servers were it is hosted to my VPN server at Huesca (the little Raspberry PI). There, it is encrypted, and sent to my laptop at my residence Barcelona. This means that my download speed while connected to the VPN will be limited by either the upload or the download speed of the connection at Huesca, the one that is smaller. In addition, encrypting the contents takes time and can reduce bandwidth.
However, my residence has 10MB download speed, and I have 300MB download / 30MB upload at Huesca so that is not a problem :)
PRO-TIP: When your residence is even more paranoid
It may be the case that your residence’s firewall blocks outbound connections to the port used by OpenVPN. Oh my god! Then, how can we connect to the VPN!! No worry, as there is a solution for almost everything.
No firewall blocks HTTPS requests. That means that outbound connections to TCP 443 ports are always open. When installing OpenVPN, we just select TCP 443 port instead of the default one, and that is it. Just remember to open TCP 443 port in your router instead of 1194 UDP, and you’ll be ready to go.
All the traffic that goes to your VPN will be seen by the Residence’s Firewall as HTTPS traffic to some domain that will not be blocked (you just created it).